Fabrication at Churchfield Racing
Building for 2019...
The Fabricator Page: This is a mish-mash of tips, tricks and FAQ
pages that may solve some problems and help you avoid another DNF...
Index:
Starting with the Body...
Replace
an Axle End...
Remove a pilot bushing...
Suspension Analyzer Software...
~~~~~~~~~~~~~~~~~~~~~~~~~~~~~~~~~~~~~~
Remove a
pilot bearing
(3/2/19)Ok here is a tip you might be
interested in. I know, these tips are not really fabrication, but in the grand
scheme of racing, anything you do to prepare a racecar, or upgrade, or repair,
you will need to apply some
form of fabrication. In this case we fabricate
a tool to remove a pilot bushing. This should also work with "bearings", but
if the bearing is really torn up, this removal tip is not going to work for
you. Our simple
tool saves us a trip to Walmart and about 25 bucks. For a
once-in-a-while tool...yeah I can do that.
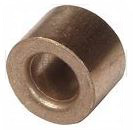
At the rear of your engine's crankshaft there
should be a pilot shaft bushing inserted to maintain proper driveline to
engine relationship. The pilot bushing is present so the transmission input
shaft maintains proper
alignment with the crank. The bushing must be
inserted properly. That is, there is a stop on the inside of the crank that is
machined to a proper depth. The bushing should be inserted to this stop (or
step).
f I may
let me explain why. The rear main bearing that supports the crankshaft is
known as the "thrust bearing". This bearing actually is designed to move a
short (few thousands) distance to properly load the crankshaft under engine
stress. These bearings are designed to take axial loads when forces are
applied. Such forces include a small movement "back and forth" of your
ctankshaft during rev up and down. Hydraulic forces that we cannot control
will "thrust" the crank forward and backward under normal operation. In a drag
car for example, the amazing thrust placed on the crankshaft during "go
green", is beyond your imagination. Granted there are several ways to un-load
these forces, but your engine oil system is the first element involved. The
same hydraulic pressure that causes your crankshaft to "float" above these
bearings, is required in order to protect the "thrust bearing" al the rear of
your engine block.
 Now that we are
beyond "thrust bearings 101", we can continue. For those with big dollars, you
can apply the Perkins system to your race engine. This adapter protects the
crank in a way that allows the
pilot shaft to slide in and out as
the crank moves rearward under acceleration. For the rest of us in Street
Stock, we generally choose a "brass bushing" or a "roller bearing" type
alignment, but too
many of us do not insert the bearing to proper
depth. This is where we make our mistake...not allowing the crank to
move rearward without binding to the pilot shaft, we are damaging the "pilot
bearing,
pilot shaft and thrust bearing"...which leads to engine
repairs, and transmission repairs. I won't mention possible clutch damage.
Please understand, you guys running automatics, this is not an issue, but
you
must understand how important the crankshaft thrust bearing is, no matter what
driveline you apply power too!!
So, the best way to check your
installation...pull back your bell housing from the engine. Lay a ruler across
the face of the bell housing and check the depth of the pilot shaft. That is,
measure from the ruler edge to the face of the pilot shaft. Now measure the
distance the crankshaft protrudes beyond the "bell" face of the block. You now
have two numbers, subtract. Now measure the depth your pilot bearing is
inserted into the block. Now measure the length of the pilot shaft from face
to clutch pilot gear. Doing the math as shown here, you should have a deficite
as defined by your crankshaft supplier. That deficite is the amount your
crankshaft will move rearward without binding hard on the pilot clutch gear.
You should never allow the pilot to "push hard" on the pilot gear...for any
reason, this is bad for your crankshaft. Remember...this movement is thousands
of an inch, maybe .003 at maximum, but if the crank is not allowed to move,
the crankshaft "thrust" bearing will not live very long.
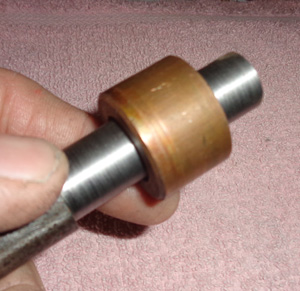 The tool we fabricated is simple to make on your lathe. Take a 3/4 bar stock
of solid mild steel and turn down the bar to the diameter of your pilot shaft,
less a few thousands to
allow the tool to slide in and out of the
bushing like a piston. Now take any lubricating grease, not your expensive
stuff, and fill the cavity of your crankshaft with grease. Go ahead
fill
the entire cavity behind the bearing. Now push the tool into the pilot bearing
and pump like a piston. You may have to add some grease while the bearing is
moving out, until
the bearing is removable by hand.
You
simply created a hand pump. Very much like the "grease sleeve" tool that you
can buy on eBAY that allows you to use your grease gun like a pump. These
tools work, but
they are a ball-buster to use. You have to hold the
grease gun, push the handle on the gun and keep the tool in place hoping it
does not pop out before it pushes the bushing
out far enough to grab
with a screw driver...very awkward. Hydraulic pistons work but they must fit
properly.
If you want one of these tools made for you...contact us.
Give us the dimension of your pilot shaft and Gary will turn one on our lathe.
The material and labor is about 25.00
to do this for you. Takes
about 20 minutes and saves you hundreds of dollars in aggrevation.
Anyway,
that is how you remove your polit bearing. BTW: Did I mention, you should drop
your pan and check the "thrust bearing" in your engine, if you see any wear on
that
brass bushing. The pilot shaft will not show much wear, but the
brass bushing will tell the tale. Don't destroy a good engine over a 15.00
part!!!
~~~~~~~~~~~~~~~~~~~~~~~~~~~~~~~~~~~~~~~~~~~~~~~~~~
Suspension
Analyzer Software: (2/16/20)
We all have seen these programs advertised on the Internet. They are very
interesting, but most local racers don't have the time to learn them and many
local builders believe these programs
were designed for asphalt racers. A
few chassis builders refer to them, but like most of us, we figure once the
suspension is right we don't need to analyze it at all. "Just a waste of
time" was what I
was told. A lot of buillders will use the same jigs
they make up for their
personal racecars, to build you yours.
After all what can go wrong??
Dirt racing is not rocket science. All you have to do is
build a massive
hammer with light weight components and stand on the gas. You are not using
that left front anyway so why worry about suspension points, roll centers,
bump steer or center link
pivot points??
Maybe we should think about
that again. Promoters have become less agressive with track preperation. They
allow their track to slick over by feature time, while they are sluggish as
all muck for the
heats. This seems to be normal prep these days. Promoters
figure that racers don't care too much about the surface anymore. You don't
see old "farts" out on the track looking for moisture.
In many cases, the
promoter will not allow you out there anyway. Certainly, runnning bike races
is not going to dry out a track, but I am going to argue that for one reason.
Top moisture is
going to dry up whether you race on it or not. I care
less if you run bikes, that time is valuable track time and Mother Nature
does not care how much clay you have mixed in with your dirt. The
"old
lady" is going to suck it dry.
A dry slick surface lends itself to
scientific thought. We must get the most out of our roll centers. We must get
the car to lay down on the track and bite as much clay as possible. A
rubbered over
surface might as well be asphalt and loose is not going to
be the fastest way around the track. To top all this off, tire rules have
become the norm these days. Tracks have restrictions regarding
grooving
and siping. You can watch a good video here
-
 This is just one basic YouTube video.
So now that you get the point, let me carry on here. If your rules do not
allow siping or grooving
you are at the mercy of the track and your
suspension. You can't play with tires, so you must adjust everything else in
order to get the most out of your basic Hoosier block 1300. Hell, stagger is
just as hard to come by using these tire rules. You will need to understand
"roll centers" if you can only grab a inch or so of tire step.
So let
us look at what suspension analyzer software really does.
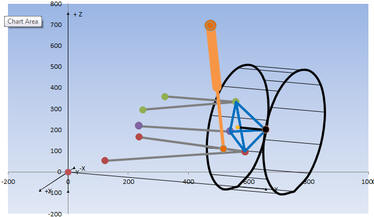
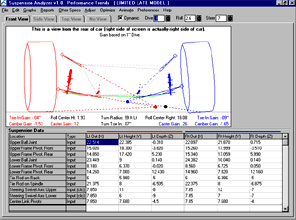
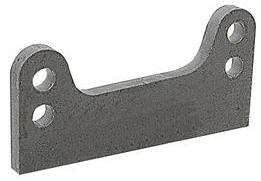
Screen Shot Reference:
Dynatune
Performance Trends
Allstar 60190
To be
straightforward with you...nothing
unless your data is correct. You can analyze to your mind goes limp and
without understanding your data, you are dead in the water. One of the
greatest
suspension analyzers created was the Bill Mitchell WinGeo
application. The Mitchell software was expensive, but technically very
diverse. It is probably still used today by many race teams.
There are images
and screen shots on the Internet, but I cannot find any other details. The
Dynatune software (shown above) is an Excel Tool for design and handling
adjustments. Although I
would say this is not exactly what a dirt racer would
use, it does however have some features which aid in chassis design for
weight transfer and brake line design. There is one software program
worth looking
into. Performance Trends Suspension Analyzer 2.4 (illustrated above). This
software is not terribly expensive and I would think most reliable
chassis buillders have a running version at
their shop.
The illustrated applications above can be reviewed by clicking on the
Reference links above. The Suspension
Analyzer is a very unique program in as much as it will help you design a
solid front end while allowing you to correctly control your "roll centers"
from front to rear. There are several example setups and after you learn the
intricate functions you will be able to make
decisions regarding changes
that effect your steering setup. Remember, there are front and rear
suspension modules that actuually work together. I suggest you download the
program demo.
This is a full function version of the software. It will
demo for 10 days and then you need to purchase. You can make the decision for
yourself. I am not a salesman here, I do not receive any
commissions for
this endorsement. I entered into this via the same demo package. Consider me
a user who thinks you might benefit from the program.
My experience.
I had to find something that would tell me if I was right or wrong. No one
said anything to me when I asked about
roll centers remaining
between the front tires. I finally went
to the Internet. The 2c racecar
had a lot of steering issues last season. We bent damn near everything under
front end of the car. The steering would bind at one track and be sluggish at
another.
We tried damn near everything for springs and shock packages, but
nothing worked. So at the end of the season I sat down on the floor and
started to analyze it all. What I found...the entire suspension
had to be
scraped. Starting with the spring jacks and ending up with the steering box,
we swapped out everything. In the process I found the upper control arm
pivots were too high above the frame
rails. At one point the A-arm
brackets were installed, incorrectly out of the box. These brackets are
generic Allstar 60190 shown above.
But, you must adjust these brackets. You can't simply weld
them
onto your frame without considering control arm angles and F-B ratios. The
kingpin inclination angles must be properly maintained or your bump steer,
caster and toe angles will be worthless,
uncontrollable and unmanageable.
If the upper arm pivot location creates a negative (upward) angle toward your
spindle, at ride height, your roll centers are somewhere in the grandstands
on the front
stretch. I mean you will nose the car over so hard that you
cannot steer the car without over rotating the rear axle. This was our exact
problem, but how do I fix that?? Obvious answer,start over!!
So I looked
for on-line help and I came upon Performance Trends software. Yes, I could
have looked at other cars and did what they were doing. That is copying the
competitors stuff. We all plagiarize
but how many of us have the same
frame, weight, shock or spring configuration?
How many of us drive our own style?
So I had to do this my way. I learned to use the program!
Video on YouTube
-

The
learning curve. At my age learning curves are like green bananas, I try
to avoid them. But I had no choice so I researched the problem and found that
the program is all about input.
Understanding
the X-Y and Z axis measurements is what this comes down to.
There are two center lines you work from. The first is the line across the
car through the spindle centers (axle center line). The second
is the
drive line center which starts at the front of the car, through the crank and
on through the pinion gear. Where these two lines meet is the forward center
of gravity.
More of this later. The inputs
required by Preformance Trends are measurements X-Y and Z to each pivot or
mounting point of the front suspension. An example would be the "upper shock
mount". That mount location is [X] from
the drive center line, [Y] from
the floor to the upper mount hole and [Z] from the axle line. The "Z"
measurement is generally input as plus or minus. For instance [Z] for the
"USM" would be +.88" because
the shock is only about an inch behind
(toward the rear) the axle line...[Z]
is depth for or aft of the axle line.
The [X] measurement is always
positive to the drive center line, [Y] is always
positive in height
measured from the floor (track). That is basically all you have to know.
By placing a large piece of Ram Board under the front suspension you can draw
the center lines and using a plum, drop the line to the floor and mark the
points. Now all you do is measure the points when
compared to the lines.
The [Y] measurements can be done with or without marking any floor points;
these are height in inches above ground.
Example: The lower ball joint should be [X] at 24 inches from
drive
center, the [Y] shoube be about 8.5 inches from floor (depending on tire
diameter) and [Z] would be about .5 because it is located at the axle line.
I think you can see that in your mind. You want
to input these numbers
into the program, and compare the 3D wire image with your racecar. That
is the basis of the program, and it all comes down to "XYZ" input. I have placed
PDF files on the site for
you to download. These will help you get started
with a basic suspension setup on your Street Stock Metric GM chassis. You can
save the data and make changes to the suspension.
Run the animator
to
investigate binds and log "realtime data" of camber, caster and toe changes.
You will be able to see just where your "roll centers" actually locate as the
vehicle steers and rolls. What this allows you
to accomplish is locate
that extreme roll center onto the tire scrub line. The roll center line
travels through the car to the rear roll center. Maintaining a proper F-B
roll center allows you to make more
accurate cross-weight changes that
will effect the weight placed on the RF during turn entry. This reason
alone is why I suggest you take the time to demo the software.
Apendices and Postscripts:
The basic X_Y_Z axis tutor file is here
-

The input X-Y-Z Chart is here -

The Street Stock Brake Bias Illustration is here -

The 5carStreetStock input file (metric chassis) is here -

Download the file, extract and save as to your C:/Program Files/Performance
Trends/3D Data/My-Tests/5carV20
You should be able to select my suspension
chart files and test them in Version 2.0 or 2.4b.
~~~~~~~~~~~~~~~~~~~~~~~~~~~~~~~~~~~~~~~~~~~~~~~~~~~~~~~~~~~~~~~~
Body Hanging Tips: (2/22/19)
There
was a very good article written by Jeff Huneycutt and published on Circle
Track website back in April 2015. Jeff is well known for his highly
opinionated articles that guide racers in the proper
direction. After
reading the article I began to hang our 2019 Pro Stock body. I decided not to
write an entire article, but instead add my opinions, tips, ideas and basic
simplestic-expertise to the
article.
Hanging an aluminim body -- create a template -- transfer to aluminum
sheet -- bend, fold and bead roll -- mount to chassis -- tab "A" meets tab
"B", now rivet them together -- repeat and repeat!!
I
have posted the article here on the website. Simply click here
 and the .PDF Acrobat file will download for you.
You may need the latest Acrobat Reader. The article is not complete, and
neither is the
car at this point, but the original article by Mr.
Huneycutt is. Afterall that is what you came for...

There is a home improvement
product that might interest you...Ram Board. The product is used by home
owners who want to protect floors and interior areas while demolition or
construction work is on going.
So what can body builders use it for?? Well
this is a sturdy "paper" product that can be used as panel templates. Unlike
cardboard, Ram Board is easier to work with and comes in a size perfect for
body side panels. A roll of
the product is 36 inches by 50 feet. It can
be folded on a break, and is sturdy enough to mock up an entire side of your
car prior to working with aluminum sheets. Then...when you are ready to cut
that aluminum, lay some RAM Board on the garage floor to protect your
investment. You can purchase a roll of rosin paper, but the Ram Board is much
thicker and it holds shape much better.
Note: If you have a neighbor or a friend in
the stainless steel cabinet fabrication business, these people receive their
sheets of material from the manufacturer with a similar paper product that is
used to separate each sheet of fine stainless when they are delivered on
pallet. This paper product is very much like Ram Board, however it is not
quit as strong. But, the good thing, it comes in 4 by 10 sheets. If you know
where you can find these "disposable" paper sheets, you can build your panels
and save a lot of money.
~~~~~~~~~~~~~~~~~~~~~~~~~~~~~~~~~~~~~~~~~~~~~~~~~~


 Now that we are
beyond "thrust bearings 101", we can continue. For those with big dollars, you
can apply the Perkins system to your race engine. This adapter protects the
crank in a way that allows the
  The tool we fabricated is simple to make on your lathe. Take a 3/4 bar stock
of solid mild steel and turn down the bar to the diameter of your pilot shaft,
less a few thousands to


